The Manual Controls
Most raw processing software offer at least two controls for altering the white balance manually. One is Temperature and the other is Tint. Temperature is used to shift the color from warm to cool (essentially from red to blue). Usually, the control is a slider that you slide left to cool down a warm photo, and right to warm up a cool photo. The control displays an approximate color temperature, which should match the temperature of the light source once a proper white balance is achieved.
From previous postings we know that incandescent lights emit a very warm light, so for a photo taken with incandescent light we would slide the temperature control to the left to lower the temperature. Shade produces a cool, high temperature light, so for a photo taken in shade we would slide the control to the right to raise the temperature.
The other control you will find is for Tint. This control shifts the color between green and cyan and is used to level the RGB values after the color temperature has been set. This is needed because the variability in spectral content between light sources.
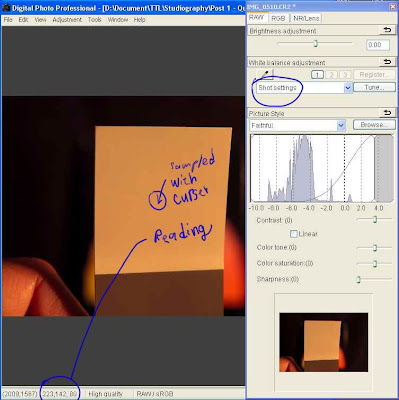 So let's take a look at how we can set the white balance manually using DPP. In this first image we are looking at the shot of the white balance card from earlier in this series. The light source was tungsten, so the appearance is heavily biased toward red (the color temperature is very warm).
We begin the process of finding the white balance by first setting the adjustment mode (circled at the upper right of the image) to “Color Temperature” as shown in the next photo.
 Next, we move the temperature slider until the white patch appears close to white. Measurements are taken by simply moving the cursor over the white patch. Note that the measurements will vary a little from spot to spot, but one quickly gets an idea of just how close to a neutral white the color is getting. Remember that neutral will be when all three of the RGB values are identical (or in this case, close).
I was able to get a reading of 157, 148, 149 by only adjusting the color temperature slider. This is not bad at all, but why stop there when we can shoot for something better? With DPP we can fine tune the color by pressing the “Tune” button.
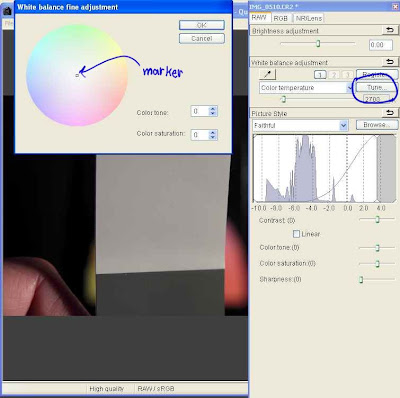 The “White balance fine adjustment” window pops open and in it we can see a color wheel that covers the rainbow around its perimeter, with a graduated fading to white toward the center. In the center is a a small movable marker. Moving the marker toward any color will add that color to the image. The closer it is moved toward the perimeter, then the more of that color gets added. Note that the colors for opposing sides of the color wheel are opposite colors. This gives you a visualization of what is happening with your image as you move the marker. Moving it toward red, adds red and subtracts cyan. Moving it toward blue, adds blue and subtracts yellow, and so on.
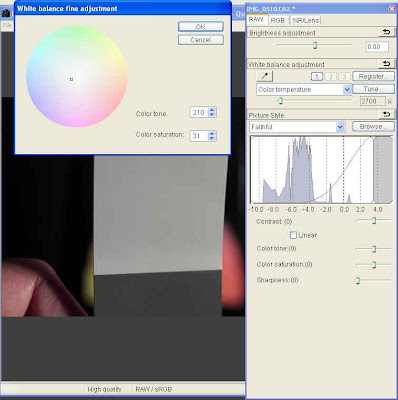 Since the RGB reading of 157, 148, 149 indicates a bit too much red, I moved the marker just a little towards cyan. Unfortunately, Canon did not think to provide a way to measure the effect on the image while the White balance fine adjustment window is open, so to test the impact of the adjustment, this window must be closed so a measurement can be made. Clicking “OK” will close the window without loosing the adjustment setting.
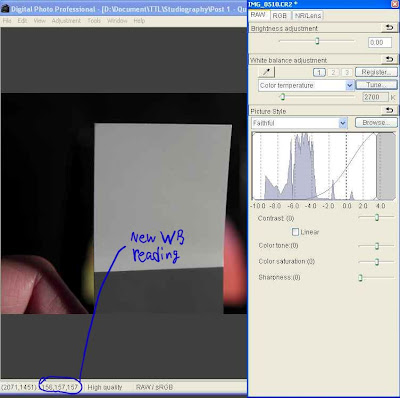 I performed a series of adjustments by opening and closing the White balance fine adjustment window until getting the near perfect white balance seen in the next image. The reading of (155, 156, 157) is very good, so I leave it at that.
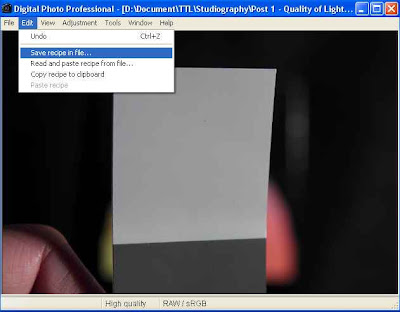 One of the advantages of using raw files is that you can set the white balance for all files shot under the same lighting. To make this easy, Canon have supplied a way to save the image settings (which Canon calls a “recipe”) into a file. Select the Edit menu and then Save recipe in file... as shown. You can give the recipe any name you like.
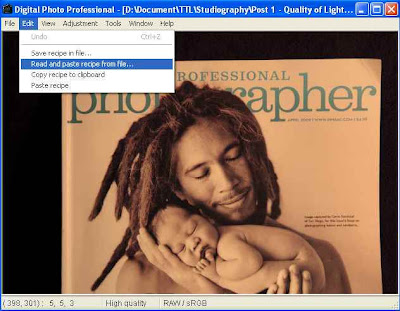 Since I have a photo that was taken under the same lighting as the white patch, I want to apply my saved recipe to it. I open the photo in DPP and then to make use of the recipe, select the Edit menu and then Read and paste recipe from file...
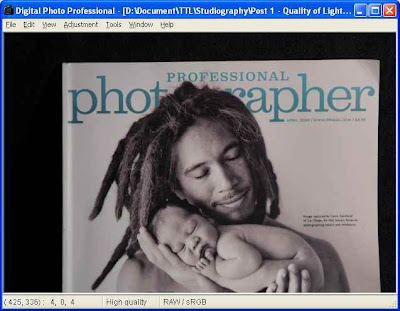 The file has inherited the saved settings and the result is a perfectly white balanced image.
If there are several for which you want to apply the same recipe, this can be done from DPP's main window without opening a raw file. Simply select the images (holding down the control key lets you select multiple individual images) and then access the Edit menu and then Read and paste recipe from file... and select the previously saved file. All of the selected files will inherit the saved settings.
Coming Next
I can see that this post is getting kind of lengthy, so I'm going to break it apart. Next time I will cover manual white balance using Bibble Pro. Until then...
-Gene
Continue on to Temperature of Light - part 9 (Manual White Balance with Raw Files using Bibble 4.10 Pro)


Just wondering what settings you set on the camera in order to shot the grey card
ReplyDeleteIf doing a manual white balance, the settings shouldn't matter, but it is usually best to use a setting that most closely matches the light source so that the camera's LCD display will have a reasonable representation of how the photo will look.
ReplyDelete